
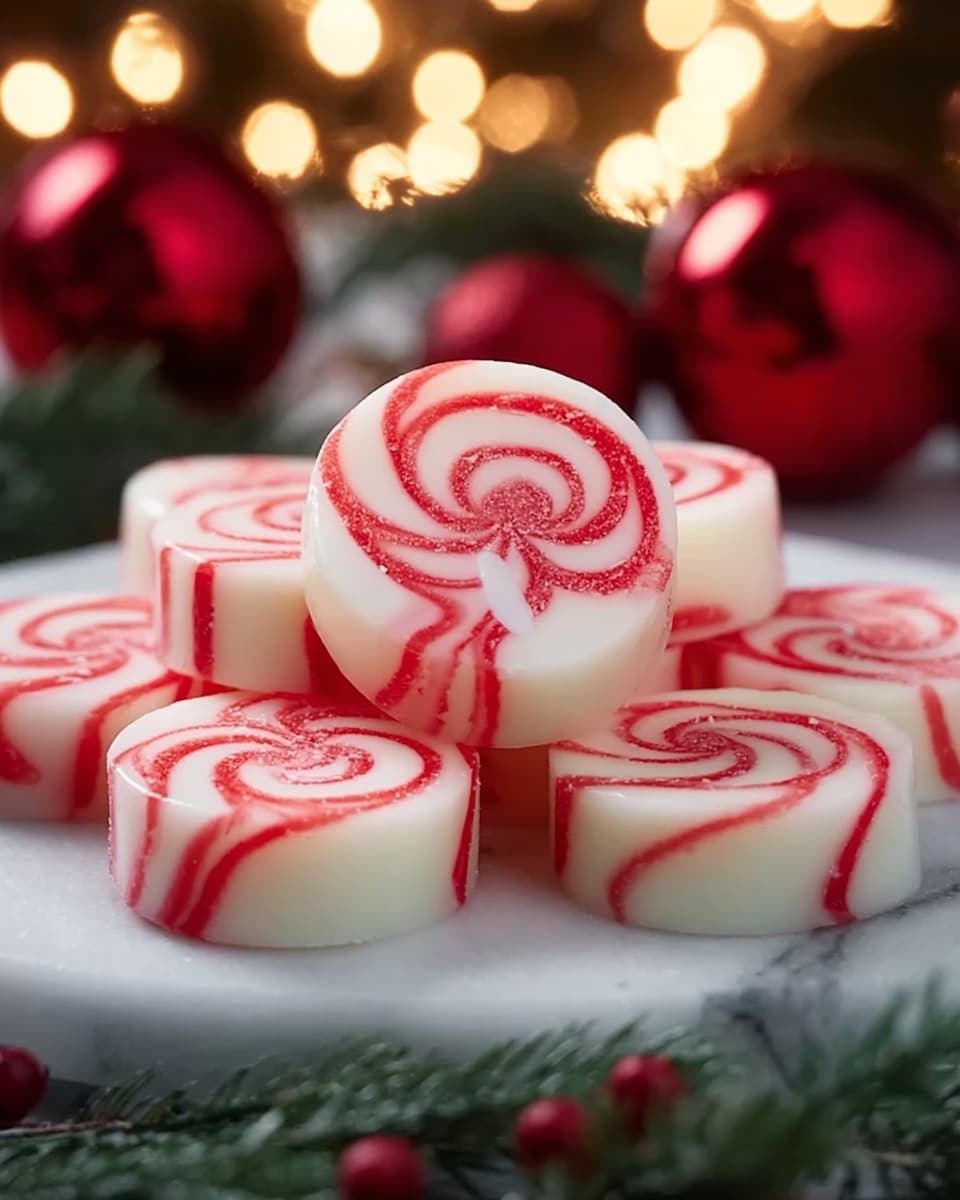
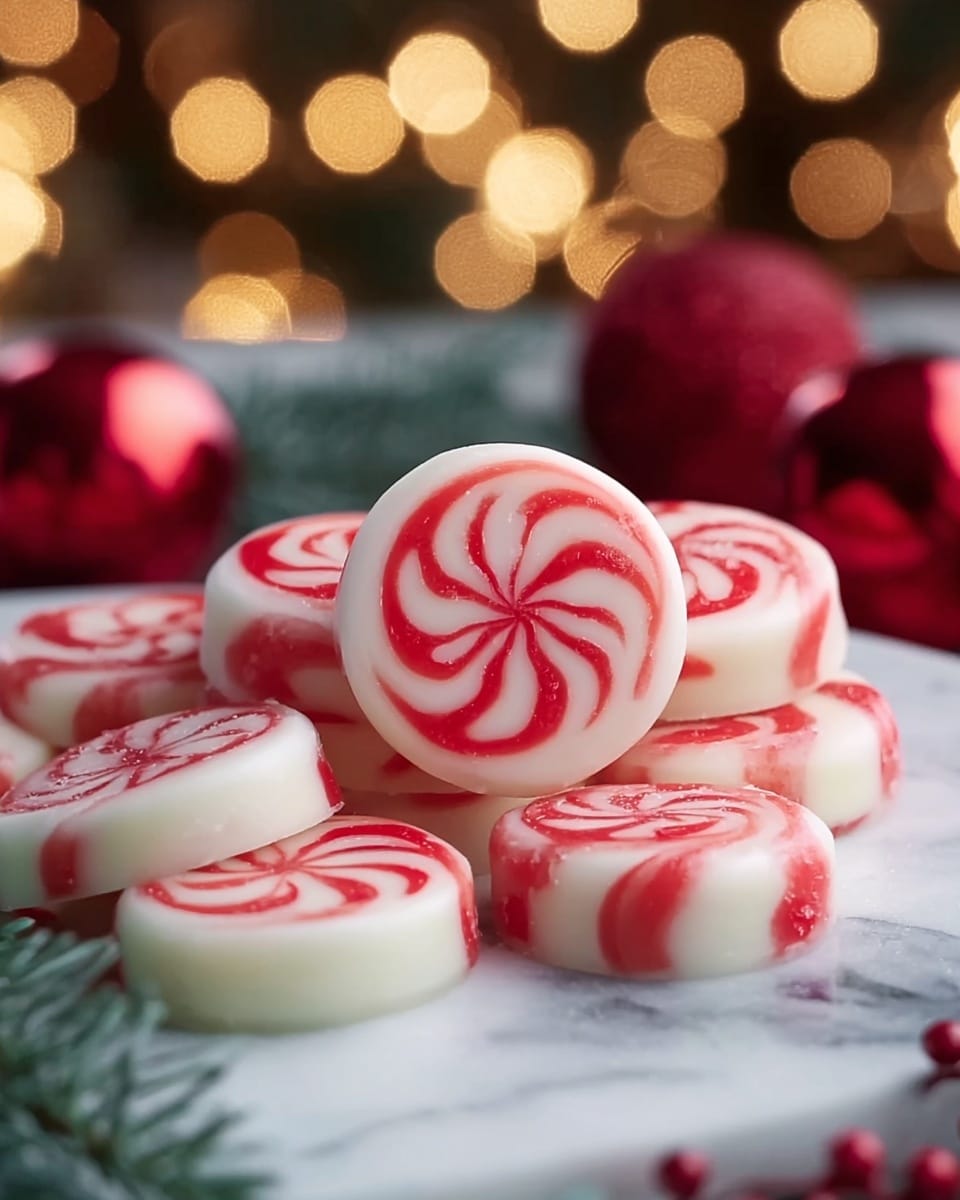
There’s something truly enchanting about festive treats that combine nostalgia with a fresh twist — and that’s exactly why The Magic of Soft Christmas Peppermints Recipe has become a wholehearted favorite in my kitchen. These melt-in-your-mouth candies deliver pepperminty joy wrapped in soft, tender swirls that feel like holiday magic with every bite.
Why You’ll Love This Recipe
- Soft & Creamy Texture: Thanks to butter and cream, these mints melt luxuriously on your tongue.
- Festive Fun: The red-and-white swirl brings playful holiday cheer to every bite.
- No-Bake Simplicity: Just mix, twist, and dry—no oven needed, perfect for easy holiday prepping.
- Customizable Mintiness: Control how pepperminty you want each batch with peppermint extract.
Ingredients You’ll Need
The beauty of The Magic of Soft Christmas Peppermints Recipe lies in its simplicity—a handful of pantry staples that come together to create a festive, creamy treat. Each ingredient plays an essential role, from the richness and softness brought by butter and cream to the cool peppermint punch and vibrant holiday colors.
- ½ cup softened butter: Choose unsalted and bring to room temperature for smooth creaming that ensures a soft, luscious texture.
- 3 cups powdered sugar: This superfine sugar dissolves instantly for a silky sweetness that forms the perfect mint dough.
- 2 tbsp heavy whipping cream: Just a splash amps up the richness and velvety mouthfeel without weighing the candy down.
- ¼ tsp peppermint extract: The secret star that delivers that cool, fresh peppermint flavor—adjust to your minty liking.
- Red gel food coloring: For those iconic, eye-catching red swirls that scream Christmas magic and brighten the room.
Note: Exact ingredients and measurements are listed in the recipe card below.
Variations
The magic of this soft peppermint recipe is its adaptability—don’t hesitate to make it your own! Whether you tweak flavors, colors, or textures, these mints offer plenty of room for creative culinary flair.
- Chocolate Peppermints: Swirl in some melted white chocolate before twisting for an indulgent twist on tradition.
- Natural Coloring: Use beet juice or crushed freeze-dried raspberries instead of red gel for a natural hue and subtle fruity undertone.
- Extract Swaps: Try adding a drop of vanilla or almond extract alongside peppermint for layered flavors.
- Sugar-Free Version: Use powdered erythritol or monk fruit sweetener to keep it guilt-free without sacrificing softness.
How to Make The Magic of Soft Christmas Peppermints Recipe
Step 1: Beat the Butter to Fluffy Perfection
Start by beating your softened butter until it’s light and fluffy. This step is crucial because the air whipped in here creates the tender, melt-away texture everyone adores. Use a mixer on medium speed and watch the butter transform into a creamy cloud.
Step 2: Gradually Incorporate Cream and Powdered Sugar
Next, add the heavy cream and powdered sugar a little at a time, mixing thoroughly between additions. This ensures a smooth, cohesive dough without any lumps. Don’t forget the peppermint extract here—that cool, classic flavor is what makes these mints unforgettable!
Step 3: Divide and Color the Dough
Divide your dough, leaving roughly three-quarters plain and coloring the rest with red gel food color. This contrast is what brings the festive spirit to life. Adjust the color intensity based on your style—deep red or a gentle blush, both look gorgeous!
Step 4: Roll, Twist, and Shape Your Peppermints
Roll each dough portion into thin ropes and then gently twist a red and white rope together to create the iconic peppermint swirl. Pinch or cut into bite-sized pieces—you can even shape them into tiny hearts or stars if you’re feeling fancy! This step is where the fun really starts.
Step 5: Let Them Dry and Set
Allow your shaped mints to air dry for 1-2 hours for a slight firming, then cut if needed. For that perfect balance of firmness on the outside and soft creaminess inside, let them dry 24 hours before indulging. It’s worth the wait, I promise!
Pro Tips for Making The Magic of Soft Christmas Peppermints Recipe
- Use Room Temperature Butter: Softened butter blends evenly, giving Mints their signature creaminess without graininess.
- Don’t Skip the Drying Time: The 24-hour rest is key to getting that perfect texture — patience transforms these into little soft miracles.
- Twist Gently: Handle your ropes lightly when twisting to avoid squashing that beautiful swirl pattern.
- Mix Colors Evenly: Knead the color thoroughly for vibrant mints but don’t overwork the dough or it gets sticky.
How to Serve The Magic of Soft Christmas Peppermints Recipe
Garnishes
These soft Christmas peppermints shine on their own, but for extra festive flair, sprinkle some crushed candy canes or edible glitter on the plate. You can also lightly dust them with powdered sugar for a snowy effect that’s irresistible at holiday gatherings.
Side Dishes
Pair these mints with a hot cup of cocoa or peppermint tea for the ultimate cozy combo. They also complement Christmas cookies, fruitcake, or a rich holiday cheese board beautifully, making them a versatile sweet finish.
Creative Ways to Present
Display your mints in festive jars tied with ribbon or nestled in decorative holiday tins for gift-giving and parties. You can also serve them on a platter arranged in wreath shapes or inside mini cupcake liners to make each bite feel special.
Make Ahead and Storage
Storing Leftovers
Keep leftovers fresh by storing your soft Christmas peppermints in an airtight container at room temperature. They’ll stay perfectly soft and flavorful for about a week, ready whenever you crave a minty treat.
Freezing
If you want to stash these beauties longer, freeze them in a sealed container lined with parchment. Just thaw them at room temperature before serving, and they will regain their soft, tender texture without losing any magic.
Reheating
Since these mints are best enjoyed soft, no reheating is needed. However, if they feel a bit firm after chilling, simply let them sit at room temperature for 10–15 minutes to gently soften before diving in.
FAQs
-
Can I use peppermint oil instead of extract?
Yes, peppermint oil can be used, but it’s much more concentrated than extract, so start with just a drop and adjust carefully to avoid overpowering the mints.
-
Why do my mints turn out hard instead of soft?
Softness depends mostly on the butter quality and drying time. Make sure your butter is well-softened and avoid skipping the 24-hour drying, which firms the outside while keeping the inside tender.
-
Can I make these mints gluten-free or vegan?
They’re naturally gluten-free since no flour is used. For vegan, substitute butter and cream with plant-based alternatives like coconut oil and coconut cream, but note texture might vary slightly.
-
How long can I store these mints before they lose freshness?
Stored properly at room temperature in an airtight container, they’ll stay fresh for up to a week and can be frozen for a couple of months without losing their magic.
Final Thoughts
I hope you feel inspired to experience The Magic of Soft Christmas Peppermints Recipe—a simple, joyful way to add a homemade touch to your holiday celebrations. These soft, creamy, minty delights are sure to bring smiles and festive warmth to your home. Give them a try, and watch how quickly they become a treasured tradition!
PrintThe Magic of Soft Christmas Peppermints Recipe

Discover the magic of making soft Christmas peppermint candies with this easy recipe. Featuring a rich butter base blended with powdered sugar, heavy cream, and peppermint extract, these festive mints boast a creamy, melt-in-your-mouth texture. The red and white swirled twists add a cheerful holiday touch, perfect for gifting or enjoying as a sweet seasonal treat.
- Prep Time: 10 minutes
- Cook Time: 0 minutes
- Total Time: 15 minutes active + 24 hours drying time
- Yield: Approximately 50-60 mints depending on size
- Category: Candy
- Method: No-Cook
- Cuisine: American
- Diet: Vegetarian
Ingredients
Primary Ingredients
- 1/2 cup butter, softened
- 3 cups powdered sugar
- 2 tbsp heavy whipping cream
- 1/4 tsp peppermint extract
- Red gel food coloring
Instructions
- Beat the Butter: Start by beating the softened butter in a mixing bowl using a hand mixer or stand mixer until it becomes light and fluffy. Incorporating air into the butter creates a delicate, creamy texture for the mints.
- Mix in the Rest: Gradually add the heavy whipping cream, powdered sugar, and peppermint extract to the whipped butter. Continue beating until the dough is firm, smooth, and thick but easily shapeable without sticking.
- Divide and Color: Split the dough into two portions. Leave about three-quarters white, and color the remaining quarter with red gel food coloring to your desired vibrancy.
- Roll and Twist: Roll small portions of each dough color into thin ropes. Gently twist a red rope with a white rope to create the classic peppermint swirl. Pinch off the twisted ropes into individual bite-sized mints.
- Dry and Set: Let the shaped mints air dry for 1-2 hours to firm up slightly. Then cut if needed. For optimal texture, allow them to dry completely for 24 hours before serving, which ensures a firm exterior with a soft, creamy center.
Notes
- Ensure butter is softened to room temperature for easy mixing.
- Adjust peppermint extract quantity to suit your flavor preference.
- Use gel food coloring for vibrant, bleed-resistant colors.
- Allow full 24-hour drying time for best texture results.
- Store mints in an airtight container after drying to maintain freshness.


