- Boneless chicken breasts or pork loin: These provide the tender, juicy protein center of your katsu bowl—you can easily swap depending on your preference.
- All-purpose flour: Creates the first dry coating layer that helps the egg adhere to the meat.
- Eggs: Acts as the glue to bind the panko breadcrumbs, contributing to that iconic crunch.
- Panko breadcrumbs: These Japanese-style crumbs are lighter and crispier, ensuring your katsu stays perfectly crunchy.
- Vegetable oil: For frying, giving the katsu that luscious golden exterior.
- Japanese short-grain rice: Sticky and tender, it forms the perfect base to soak up all the delicious sauces and juiciness.
- Rice vinegar, sugar, and salt: Combined to season the rice gently, giving it that subtle vinegar tang you expect.
- Tonkatsu sauce, soy sauce, Worcestershire sauce, and ketchup: These four ingredients blend into a rich, tangy, umami-packed sauce that ties the entire bowl together.
- Shredded cabbage and green onions: Fresh, crunchy toppings that balance the richness of the fried katsu.
- Sesame seeds and pickled ginger (optional): Perfect finishing touches adding extra texture and flavor bursts.
Note: Exact ingredients and measurements are listed in the recipe card below.
Variations
One of the best parts about this dish is how easily you can play around with it to suit your tastes or dietary needs. Feel free to get creative and make this recipe your own delightful staple.
- Protein swaps: Use pork loin, tofu, or even shrimp for a different spin while keeping the classic katsu texture.
- Gluten-free option: Swap all-purpose flour and panko breadcrumbs for gluten-free alternatives, such as rice flour and gluten-free panko.
- Vegetable additions: Add pickled daikon radish or steamed edamame on the side to boost freshness and nutrition.
- Spicy twist: Mix in some sriracha or chili flakes into your tonkatsu sauce for a subtle kick that wakes up your palate.
How to Make Japanese Katsu Bowls: An Authentic Homemade Recipe
Step 1: Prepare the Rice
Start by rinsing the Japanese short-grain rice under cold water until the water runs clear—this removes excess starch and prevents clumping. Let the rice soak for 30 minutes in fresh water, then cook it covered over low heat. Allow it to steam quietly for the best tender, sticky texture. Finally, gently fold in the vinegar, sugar, and salt mixture to season the rice perfectly.
Step 2: Prep and Bread the Chicken
Take your chicken breasts and gently pound them out to an even ½-inch thickness – this ensures quick, even cooking and juicy meat. Season with salt and pepper, then set up a three-step breading station: flour, beaten eggs, and panko breadcrumbs. Dredge each piece first in flour, then into the egg, and finally coat thoroughly with panko to achieve that signature crunch.
Step 3: Fry the Katsu
Heat vegetable oil in a skillet to medium-high heat and carefully fry the breaded chicken for about 4-5 minutes on each side until golden brown and cooked through. Drain on paper towels briefly to remove excess oil. Patience here pays off—this step is where your crispy crust develops, so resist the urge to crowd the pan or flip too early.
Step 4: Make the Tonkatsu Sauce
While the chicken cooks, whisk together tonkatsu sauce, soy sauce, Worcestershire sauce, and ketchup in a small bowl. This blend gives you that sweet-savory umami punch that perfectly complements the crispy chicken and aromatic rice.
Step 5: Assemble Your Katsu Bowls
Start each bowl with a bed of the seasoned Japanese rice, then slice your rested katsu into easy-to-eat strips. Top with shredded cabbage, green onions, and a sprinkle of toasted sesame seeds. Drizzle generously with your homemade tonkatsu sauce and add pickled ginger for a refreshing contrast if you like. And voilà—your authentic Japanese Katsu Bowl is ready to enjoy!
Pro Tips for Making Japanese Katsu Bowls: An Authentic Homemade Recipe
- Even Thickness is Key: Pounding the chicken evenly ensures it cooks at the same rate, so you don’t end up with dry edges or undercooked centers.
- Oil Temperature Check: Use a thermometer or test with a small breadcrumb first—too hot and the crust burns, too cool and it gets greasy.
- Rest Before Slicing: Let the fried katsu rest a few minutes after cooking to keep juices locked in and maintain that delightful crunch.
- Gentle Rice Folding: When mixing in the vinegar, sugar, and salt, fold gently to avoid mashing the rice grains—you want it fluffy and distinct.
How to Serve Japanese Katsu Bowls: An Authentic Homemade Recipe
Garnishes
Garnishes add freshness, crunch, and that extra flavor pop. For these bowls, think thinly sliced green onions, toasted sesame seeds, and tangy pickled ginger. They brighten up the richness of the fried chicken and enhance every bite with subtle layers of flavor and texture.
Side Dishes
Light, refreshing sides like miso soup, steamed edamame, or a simple seaweed salad pair beautifully with the hearty katsu bowls. These sides add color and keep the meal balanced, making it feel both special and wholesome.
Creative Ways to Present
For a fun twist, assemble your katsu ingredients in individual bento boxes or mason jars layered with rice, cabbage, and sauce. Or go rustic and serve on wooden boards with dipping bowls of extra sauce on the side—presentation can be casual yet impressive!
Make Ahead and Storage
Storing Leftovers
Keep any leftover katsu separate from the rice and veggies to avoid sogginess. Store in an airtight container in the fridge and consume within 2 days for best taste and texture.
Freezing
You can freeze cooked katsu pieces wrapped tightly in plastic and foil for up to a month. Just remember to thaw fully in the fridge before reheating to keep the crust crispy.
Reheating
Reheat your katsu in a preheated oven or air fryer to keep it crunchy—microwaving tends to make the crust soggy. For rice, a quick steam or microwave with a damp paper towel restores moisture nicely.
FAQs
-
Can I use pork instead of chicken for my katsu bowls?
Absolutely! Pork loin is traditionally used in many Japanese katsu recipes and works beautifully in this bowl. Just ensure to pound it to an even thickness for even cooking.
-
What’s the best way to get super crispy katsu?
Using panko breadcrumbs and frying at just the right oil temperature (around 350°F/175°C) are key factors. Also, avoid overcrowding the pan to keep the oil hot and the crust crisp.
-
Can I make the tonkatsu sauce from scratch?
Yes! The recipe includes a simple blend of tonkatsu sauce, soy sauce, Worcestershire sauce, and ketchup that creates a delicious homemade version. Feel free to adjust to your taste.
-
Is there a vegetarian alternative for this recipe?
Definitely. You can substitute the chicken or pork with firm tofu or eggplant slices, breaded and fried the same way for a satisfying plant-based katsu bowl.
Final Thoughts
There’s nothing quite like digging into a bowl filled with crispy, juicy katsu layered over perfectly seasoned Japanese rice—comfort food at its freshest and most wholesome. I hope you enjoy making and sharing these Japanese Katsu Bowls: An Authentic Homemade Recipe as much as I do. Get ready for some happy, satisfied smiles at your dinner table!
If you’ve ever craved that perfect crispy, savory Japanese comfort food right at home, then you’re in the right place! Today I’m thrilled to share Japanese Katsu Bowls: An Authentic Homemade Recipe that captures all the irresistible flavors and textures you love about this classic dish. It’s easier than you think and perfect for a cozy, satisfying meal.
Why You’ll Love This Recipe
- Authentic Flavor: Enjoy the rich, tangy tonkatsu sauce complemented by perfectly crispy chicken every time.
- Simple Ingredients: Uses pantry staples and common fresh ingredients for an approachable cooking experience.
- Family Friendly: A dish that’s sure to please both kids and adults with its comforting textures and tastes.
- Time Efficient: Ready in about an hour, it fits beautifully into a busy weeknight dinner plan.
Ingredients You’ll Need
The beauty of Japanese Katsu Bowls: An Authentic Homemade Recipe lies in its straightforward ingredients, each playing an essential role in building layers of flavor and texture. From the fluffy Japanese rice to that golden fried katsu, every piece works together perfectly.
- Boneless chicken breasts or pork loin: These provide the tender, juicy protein center of your katsu bowl—you can easily swap depending on your preference.
- All-purpose flour: Creates the first dry coating layer that helps the egg adhere to the meat.
- Eggs: Acts as the glue to bind the panko breadcrumbs, contributing to that iconic crunch.
- Panko breadcrumbs: These Japanese-style crumbs are lighter and crispier, ensuring your katsu stays perfectly crunchy.
- Vegetable oil: For frying, giving the katsu that luscious golden exterior.
- Japanese short-grain rice: Sticky and tender, it forms the perfect base to soak up all the delicious sauces and juiciness.
- Rice vinegar, sugar, and salt: Combined to season the rice gently, giving it that subtle vinegar tang you expect.
- Tonkatsu sauce, soy sauce, Worcestershire sauce, and ketchup: These four ingredients blend into a rich, tangy, umami-packed sauce that ties the entire bowl together.
- Shredded cabbage and green onions: Fresh, crunchy toppings that balance the richness of the fried katsu.
- Sesame seeds and pickled ginger (optional): Perfect finishing touches adding extra texture and flavor bursts.
Note: Exact ingredients and measurements are listed in the recipe card below.
Variations
One of the best parts about this dish is how easily you can play around with it to suit your tastes or dietary needs. Feel free to get creative and make this recipe your own delightful staple.
- Protein swaps: Use pork loin, tofu, or even shrimp for a different spin while keeping the classic katsu texture.
- Gluten-free option: Swap all-purpose flour and panko breadcrumbs for gluten-free alternatives, such as rice flour and gluten-free panko.
- Vegetable additions: Add pickled daikon radish or steamed edamame on the side to boost freshness and nutrition.
- Spicy twist: Mix in some sriracha or chili flakes into your tonkatsu sauce for a subtle kick that wakes up your palate.
How to Make Japanese Katsu Bowls: An Authentic Homemade Recipe
Step 1: Prepare the Rice
Start by rinsing the Japanese short-grain rice under cold water until the water runs clear—this removes excess starch and prevents clumping. Let the rice soak for 30 minutes in fresh water, then cook it covered over low heat. Allow it to steam quietly for the best tender, sticky texture. Finally, gently fold in the vinegar, sugar, and salt mixture to season the rice perfectly.
Step 2: Prep and Bread the Chicken
Take your chicken breasts and gently pound them out to an even ½-inch thickness – this ensures quick, even cooking and juicy meat. Season with salt and pepper, then set up a three-step breading station: flour, beaten eggs, and panko breadcrumbs. Dredge each piece first in flour, then into the egg, and finally coat thoroughly with panko to achieve that signature crunch.
Step 3: Fry the Katsu
Heat vegetable oil in a skillet to medium-high heat and carefully fry the breaded chicken for about 4-5 minutes on each side until golden brown and cooked through. Drain on paper towels briefly to remove excess oil. Patience here pays off—this step is where your crispy crust develops, so resist the urge to crowd the pan or flip too early.
Step 4: Make the Tonkatsu Sauce
While the chicken cooks, whisk together tonkatsu sauce, soy sauce, Worcestershire sauce, and ketchup in a small bowl. This blend gives you that sweet-savory umami punch that perfectly complements the crispy chicken and aromatic rice.
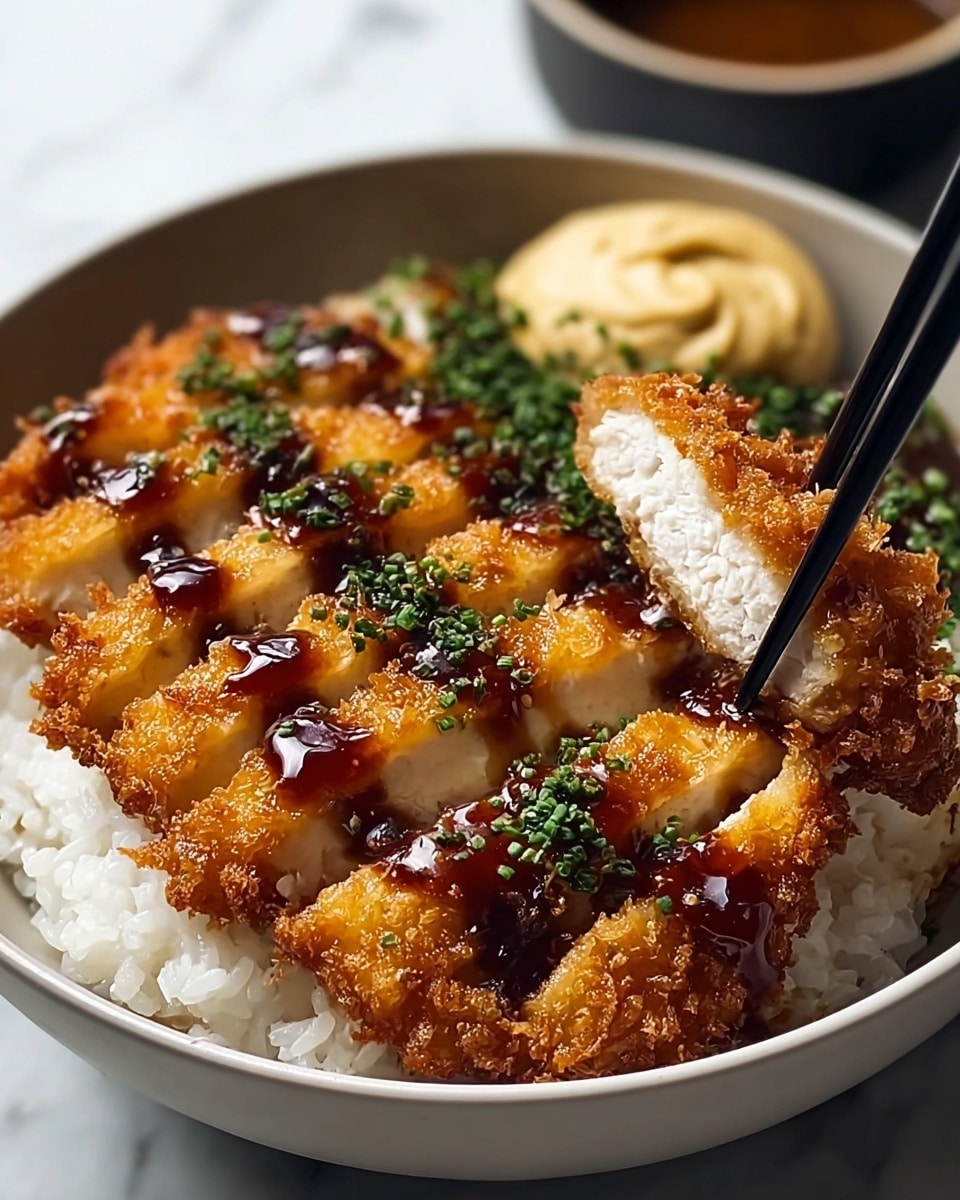
Step 5: Assemble Your Katsu Bowls
Start each bowl with a bed of the seasoned Japanese rice, then slice your rested katsu into easy-to-eat strips. Top with shredded cabbage, green onions, and a sprinkle of toasted sesame seeds. Drizzle generously with your homemade tonkatsu sauce and add pickled ginger for a refreshing contrast if you like. And voilà—your authentic Japanese Katsu Bowl is ready to enjoy!
Pro Tips for Making Japanese Katsu Bowls: An Authentic Homemade Recipe
- Even Thickness is Key: Pounding the chicken evenly ensures it cooks at the same rate, so you don’t end up with dry edges or undercooked centers.
- Oil Temperature Check: Use a thermometer or test with a small breadcrumb first—too hot and the crust burns, too cool and it gets greasy.
- Rest Before Slicing: Let the fried katsu rest a few minutes after cooking to keep juices locked in and maintain that delightful crunch.
- Gentle Rice Folding: When mixing in the vinegar, sugar, and salt, fold gently to avoid mashing the rice grains—you want it fluffy and distinct.
How to Serve Japanese Katsu Bowls: An Authentic Homemade Recipe
Garnishes
Garnishes add freshness, crunch, and that extra flavor pop. For these bowls, think thinly sliced green onions, toasted sesame seeds, and tangy pickled ginger. They brighten up the richness of the fried chicken and enhance every bite with subtle layers of flavor and texture.
Side Dishes
Light, refreshing sides like miso soup, steamed edamame, or a simple seaweed salad pair beautifully with the hearty katsu bowls. These sides add color and keep the meal balanced, making it feel both special and wholesome.
Creative Ways to Present
For a fun twist, assemble your katsu ingredients in individual bento boxes or mason jars layered with rice, cabbage, and sauce. Or go rustic and serve on wooden boards with dipping bowls of extra sauce on the side—presentation can be casual yet impressive!
Make Ahead and Storage
Storing Leftovers
Keep any leftover katsu separate from the rice and veggies to avoid sogginess. Store in an airtight container in the fridge and consume within 2 days for best taste and texture.
Freezing
You can freeze cooked katsu pieces wrapped tightly in plastic and foil for up to a month. Just remember to thaw fully in the fridge before reheating to keep the crust crispy.
Reheating
Reheat your katsu in a preheated oven or air fryer to keep it crunchy—microwaving tends to make the crust soggy. For rice, a quick steam or microwave with a damp paper towel restores moisture nicely.
FAQs
-
Can I use pork instead of chicken for my katsu bowls?
Absolutely! Pork loin is traditionally used in many Japanese katsu recipes and works beautifully in this bowl. Just ensure to pound it to an even thickness for even cooking.
-
What’s the best way to get super crispy katsu?
Using panko breadcrumbs and frying at just the right oil temperature (around 350°F/175°C) are key factors. Also, avoid overcrowding the pan to keep the oil hot and the crust crisp.
-
Can I make the tonkatsu sauce from scratch?
Yes! The recipe includes a simple blend of tonkatsu sauce, soy sauce, Worcestershire sauce, and ketchup that creates a delicious homemade version. Feel free to adjust to your taste.
-
Is there a vegetarian alternative for this recipe?
Definitely. You can substitute the chicken or pork with firm tofu or eggplant slices, breaded and fried the same way for a satisfying plant-based katsu bowl.
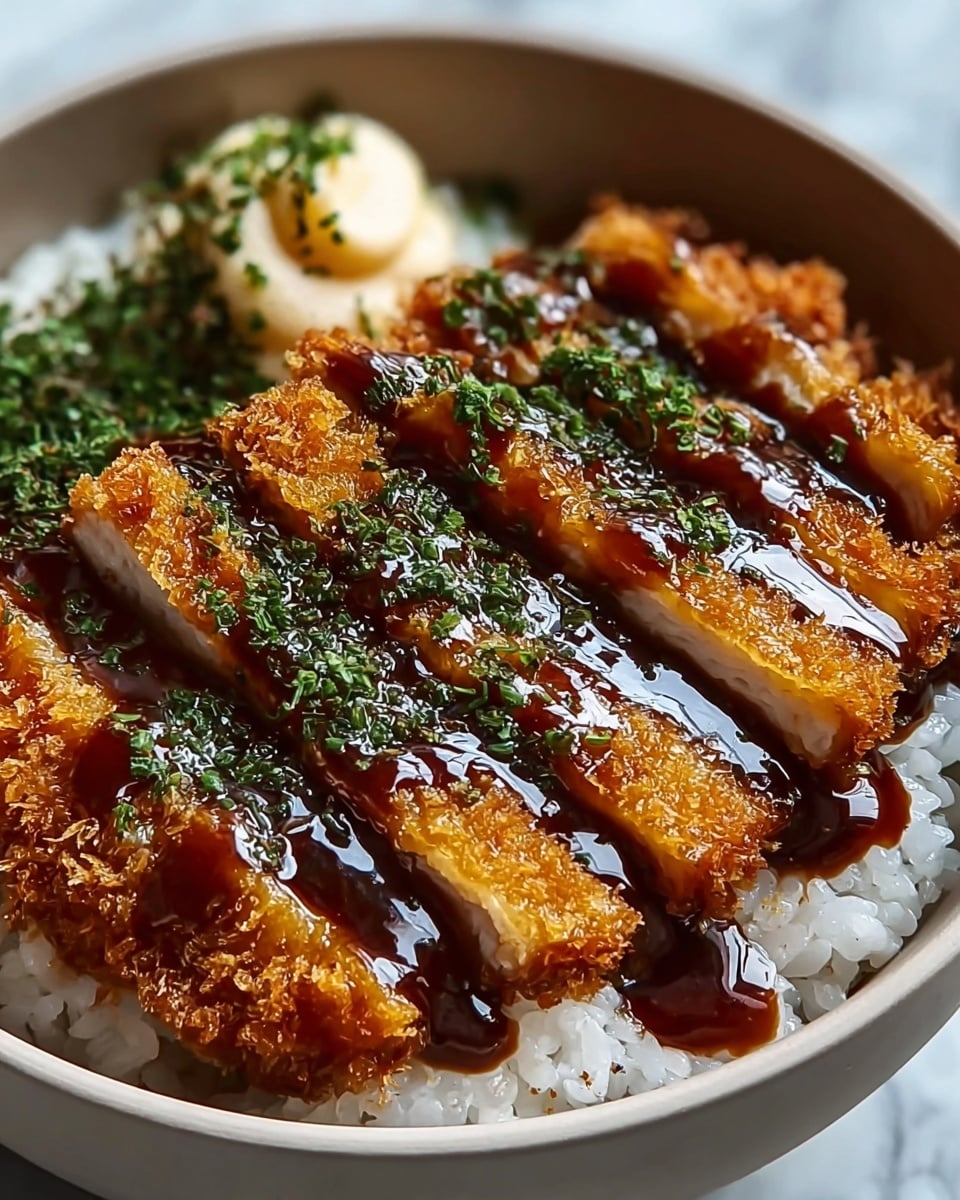
Final Thoughts
There’s nothing quite like digging into a bowl filled with crispy, juicy katsu layered over perfectly seasoned Japanese rice—comfort food at its freshest and most wholesome. I hope you enjoy making and sharing these Japanese Katsu Bowls: An Authentic Homemade Recipe as much as I do. Get ready for some happy, satisfied smiles at your dinner table!